Ipe - Batten - Eased Edges - 40 x 18mm
Product Code: C-000434£66.40 per m² ex. vat
Lengths available:
- 1850mm
- 2140mm
- 2440mm
- 2740mm
- 3050mm
- 3350mm
- 3660mm
- 3960mm
- 4270mm
- 4570mm
- 4880mm
- 6100mm
Enter your cladding area for estimate price:
Area
Price (Based on 1850mm)
Contact our experts for a price including delivery and recommended fixings:


We believe in the power of premium materials to transform spaces, inside and out.

We strive to deliver your products as promptly as possible, so you can start enjoying them right away.

Our customers are at the heart of everything we do. That’s why we are proud to showcase our Trustpilot reviews.

Shopping with us is straightforward and stress-free. Our dedicated team is just a call or email away if you need assistance.
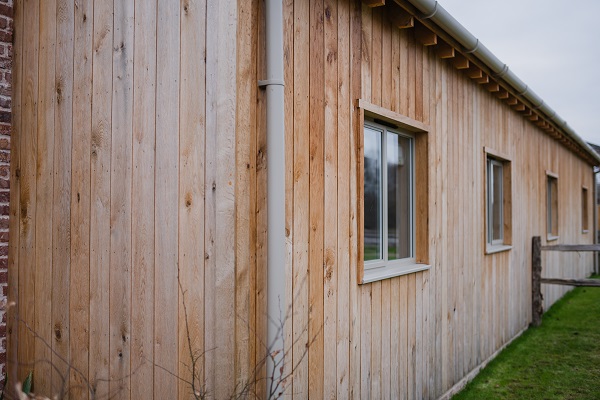
- Ipe Trellis/Batten board with an Eased edge profile
- Features clean, square edges for a sleek finish
- Made from extremely dense and durable Ipe hardwood
- Ideal for outdoor use due to its natural toughness and weather resistance
- Pricing calculated per square meter, assuming 10mm spacing between boards
- Batten boards are custom cut to order for precise sizing
- Please note: lead time may apply due to made-to-order nature
- Dimensions: 40mm wide x 18mm thick, suitable for various construction or landscaping projects
- Perfect for fencing, screening, or decorative trellis applications
Our well-organized delivery system ensures your hardwood cladding arrives promptly and in pristine condition. Depending on your location, delivery charges are calculated based on the distance, length, and weight of the materials. Whether using external couriers or our own fleet of vehicles, we take every care to ensure your order is handled safely. For more details, please see our Delivery Terms & Conditions.
Guide to Installing Timber Batten Cladding
Timber batten cladding is a stylish and versatile way to add texture and warmth to any façade or interior wall. Proper installation ensures durability, aesthetic appeal, and compliance with building standards. Follow this step-by-step guide:
1. Preparation
- Check the Surface: Ensure the wall or frame is straight, dry, and structurally sound.
- Moisture Barrier: Install a breathable membrane or vapour barrier to protect against moisture ingress.
- Battens & Spacing: Decide on batten size and spacing (commonly 10–30 mm gaps). Mark layout lines for consistency.
2. Tools & Materials
- Timber battens (pre-treated for durability)
- Stainless steel or galvanized screws/nails
- Spirit level and chalk line
- Drill and driver
- Spacers for uniform gaps
- Protective finish (oil, stain, or sealant)
3. Installation Steps
Step 1: Fix Support Battens
- Attach vertical or horizontal support battens to the wall using corrosion-resistant fixings.
- Ensure they are level and spaced according to your design.
Step 2: Position Timber Battens
- Start from one corner or edge.
- Use spacers to maintain consistent gaps between battens.
- Check alignment regularly with a spirit level.
Step 3: Secure Battens
- Fix battens through the thickest section using screws or nails.
- Pre-drill holes to prevent splitting.
- For concealed fixing, use clips or rear-mounted brackets.
Step 4: Expansion Gaps
- Leave a 5–10 mm gap at ends and joints for timber movement.
- Avoid tight joints to prevent warping.
4. Finishing
- Apply protective coating (UV-resistant oil or stain) to enhance longevity.
- Reapply finish periodically as per manufacturer’s recommendations.
5. Maintenance Tips
- Inspect annually for loose fixings or weathering.
- Clean with mild soap and water; avoid harsh chemicals.
- Recoat timber every 12–24 months for optimal protection.
Safety & Compliance
- Follow local building codes and fire safety regulations.
- Use treated timber for external applications to prevent rot and insect damage.
Overview: Tropical Hardwood Care and Maintenance
Tropical hardwoods including Balau, Yellow Balau, Ipe, Cumaru, and Angelim Pedra are renowned for extreme density and natural resistance to rot and insects. With proper care, these premium timbers can last 25 to 75+ years. This guide provides essential maintenance practices to preserve the beauty and performance of your installation.
Your Timber Species
- Ipe (Brazilian Walnut): Olive-brown to dark-brown | 40-75+ years
- Cumaru (Brazilian Teak): Reddish-brown to cherry red | 30-50+ years
- Balau (Red/Brown Balau): Consistent brown tones | 20-30+ years
- Yellow Balau (Bangkirai): Golden-yellow to light brown | 25-40+ years
- Angelim Pedra (Brazilian Ironwood): Beige-brown with red undertones | 25+ years
Key differences for Yellow Balau: This Southeast Asian hardwood is slightly less dense than Red Balau but offers excellent durability and stability. It’s particularly valued for its attractive light colouring when fresh, though like all tropical hardwoods it will weather to silver-grey without oil treatment. Yellow Balau has natural silica content which can accelerate tool wear during installation.
Natural Weathering
- Without treatment, all species weather from rich brown to silvery-grey over 6-18 months
- UV rays and moisture cause superficial colour change only
- Weathering doesn’t affect durability or structural integrity
- Original colour can be restored with cleaning, sanding, and oiling
Colour Preservation Options
Choose your maintenance approach early:
Option 1: Natural Silver-Grey (Low Maintenance)
- Apply initial UV-protective oil after installation
- Allow natural weathering to silver-grey
- Simply keep clean with regular sweeping
- Minimal ongoing effort required
Option 2: Maintain Brown Colour (Higher Maintenance)
- Apply UV-resistant oil annually (spring/autumn optimal)
- High-sun areas may need reapplication every 6-9 months
- Products: Penofin Hardwood Formula or Messmer’s UV Plus
- Maintains vibrant colour and grain patterns
Initial Treatment After Installation
End Grain Sealing
- Seal any cut ends immediately to prevent splitting
UV Protection
- Apply UV-protective penetrating oil within first few weeks
- Use products designed for tropical hardwoods (Penofin, Messmer’s, Ipe Oil)
- Skip only if choosing natural silvering option
Cleaning and Maintenance Schedule
Weekly Tasks
- Sweep with soft brush to remove debris
- Remove leaves, twigs, and organic matter promptly
- Clean between boards to prevent moisture buildup
- Spot clean spills immediately with mild soap and water
Seasonal Deep Cleaning (Spring and Autumn)
- Remove all debris thoroughly
- Use commercial hardwood cleaners (Woodrich EFC-38 or Messmer’s)
- Two-part cleaner/brightener systems restore grey wood to near-original colour
- Allow 1-2 days drying before applying treatments
- Apply UV-protective oil if maintaining brown colour
- Inspect and tighten fasteners
- Check for damaged boards
- Verify proper drainage and ventilation
Additional Summer Tasks
- Monitor for excessive drying
- Maintain regular sweeping routine
Additional Winter Tasks
- Remove snow/ice promptly (avoid metal shovels)
- Monitor for standing water or ice buildup
Annual Inspection
- Check all fasteners and tighten as needed
- Inspect for loose, warped, or damaged boards
- Ensure water drains away properly
- Verify ventilation pathways remain clear
- Trim back vegetation for clearance and airflow
- Address any issues immediately
Common Problems and Solutions
- Surface Greying: Clean, lightly sand, apply UV-protective oil
- Mould/Mildew: Clean with hardwood cleaner, improve ventilation and drainage
- Cupping/Movement: Ensure proper ventilation beneath structure, keep debris clear
- Persistent Staining: Use specialized hardwood stain removers, light sanding if needed
Cleaning Methods
Basic Cleaning
- Use mild soap and water with soft brush
- Stiff brush for stubborn dirt
- Rinse thoroughly with garden hose
- Clean spills promptly to prevent staining
Pressure Washing (Use with Caution)
- Only when necessary for deep cleaning
- Start at 3.5 MPa, maximum 8.3 MPa for Ipe (less for Balau)
- Fan spray tip with 40-60 degree spread
- Work with grain about 30cm from surface
- Test inconspicuous area first
- Improper technique permanently damages wood
Stain Removal
- Most household stains fade naturally over time
- Use specialized hardwood cleaners for stubborn stains
- Light sanding may be needed for deep stains
- Reapply protective oil after treatment
Oil Application Process
Follow these steps for best results:
- Clean surface thoroughly with wood cleaner/brightener
- Allow to dry completely (1-2 days)
- Lightly sand with 80-grit sandpaper if needed
- Remove all dust and debris
- Apply oil according to manufacturer’s instructions
- Work in manageable sections to avoid lap marks
- Reapply when water no longer beads on surface
Ventilation and Drainage
Essential for preventing moisture damage:
- Keep vegetation trimmed back from all surfaces
- Ensure water drains away from structure
- Never allow standing water on deck
- Maintain clear ventilation pathways beneath structure
- Remove any obstructions under deck
- Good airflow prevents cupping and movement
Restoration and Refinishing
When to Refinish
- Wood looks dry or faded
- Water no longer beads on oiled surfaces
- After several years if colour restoration desired
Restoration Process
- Strip old finishes if necessary (use wood stripper)
- Clean with wood brightener
- Light sand with 80-grit sandpaper to remove silvered surface
- Remove all dust thoroughly
- Apply fresh oil finish
- Restored areas will weather to match surroundings
Product Recommendations
Cleaners
- Speak with our team about the Treatex products best suited for your selected tropical hardwood species
UV-Protective Oils
- Speak with our team about the Treatex products best suited for your selected tropical hardwood species
Tools
- Soft-bristled brush/broom
- Stiff scrubbing brush
- 80-grit sandpaper
- Garden hose with spray nozzle
Best Practices for Long-Term Care
- Establish regular maintenance routine from the start
- Keep detailed records of treatments and dates
- Use only products specifically designed for tropical hardwoods
- Choose maintenance approach early (natural grey vs. maintained colour)
- Apply treatments in dry, temperate conditions
- Never allow standing water to persist
- Address small issues immediately before they escalate
- Sand lightly when restoration needed
- Reapply oil when water stops beading
- Consider professional cleaning every 3-5 years for large installations
- Consistent care dramatically extends lifespan to maximum potential
Need Help?
Your tropical hardwood is a premium investment designed to last decades. With proper care, Balau, Ipe, Cumaru, and Angelim Pedra installations remain beautiful and functional for 25-75+ years. For product recommendations, maintenance advice, or specific care questions, our experienced team is always on hand to assist. Contact us for tailored guidance to suit your project.